Beautiful Saturday

I’m slowly adjusting to having regular weekends and surprised by how long the days seem sometime. Take today, it’s not even 3:00 yet as I start this post and it’s been quite full!

I woke up around 6:00ish and read for about an hour in bed before getting up and making a particularly good cup of coffee, then breakfast. Then, I spent some time online reading fun blogs and catching up on emails. I caught up on some bookkeeping tasks before getting up to go do a deep clean of the kitchen proper in anticipation of leaving next month.

Around 11:00, I headed to C&C’s. I’d asked Charles, our local pest control officer, to prepare some mouse poison for me since I have active ones in the RV and the cabin and Caroline told me last night, over an impromptu glass of wine, to come by today at some point to get tomatoes. I came home just shy of noon and distributed the poison, then went in to turn the very ripe tomatoes into a fresh sauce, glad that I had remembered to buy both a ‘new’ garlic press from the Salvation Army and some dried basil at the grocery store when I was in town Thursday.

It was 1:00 by the time lunch was done and I decided to head to the thrift store in Willow Bunch. It was just too lovely a day not to go for a drive! I checked the oil in the truck before going out, then headed east.

The store was quite busy today, but there wasn’t much new stuff. I did a circuit and was about to leave empty-handed when something told me to check the coats again. There, I finally found a nice raincoat! It’s a tad big on me, but a definite improvement over my now humongous orange raincoat that I’d bought for the Chilkoot. It was only $3!

Coming out, I decided to see if the grocery store was still open as I was told it’s closing at the end of this month. Indeed, but they were having a going out of business sale with everything but meat and milk being 50% off. I was torn between being excited at the deals and sad at the loss of this vital Willow Bunch business.

Mindful that I’m leaving in a month, I still came out of there with $60 worth of groceries for $30, including two tins of coffee. They actually had the bigger containers of the dark roast that are better value than the little ones, but I’d rather pay a little more and not open up a huge amount of coffee at one time to keep it somewhat fresh. I also caved and bought some flour and a giant bag of chocolate chips to use up the rest of my bananas since we are heading out of frozen dessert weather… but I also couldn’t resist a $4 tub of Breyer’s cookies and cream ice cream! My favourite Hawaiian pizzas were available, too, so I got a couple, and I had fun fitting them and the ice cream in the freezer when I got home! I may also have come home with three jars of ‘hot dog relish’ (mustard mixed with relish) to bring down to Mexico with me… 🙂

I’m not sure what I’ll do with the rest of my day. But with it being so sunny and lovely and warm, I think there’s a swing and a good book in my future!

A Mattress Topper at Last

Since I had to go back to Plentywood today to pick up a piece for the booster, I decided to make the trip worthwhile and finally ordered myself for delivery there a mattress topper, something I badly need for my bed in Mexico. As I was shopping in earnest the other night and doing research, something hit me: those things are absolutely not portable!

They are vacuum packed and meant to expand on the bed. It would be impractical to think that I could fold it up and easily take it with me to Mexico. I’m already planning to spend money on an easy chair that I will leave behind after six months and didn’t want to spend over $100 on yet another thing that was going to have to stay. So I started searching for a travel or portable mattress topper and actually found one! It is amusingly called a Bag of Comfort by Sleep Innovations.

IMGP2366

Now, this is meant to be portable, so it’s just a 1″ piece of memory foam, a far cry from the luxuriously thick cloud on John’s RV bed in Santa Fe, but it’s definitely better than nothing.

IMGP2376

Reviews say that it’s easy to get back in the bag, so I should even be able to take it into a hotel for one night if that’s true. If I can have a more comfy bed at Totonaka in San Carlos, I would be happy to go back there because it’s so convenient.

The kit also includes a memory foam pillow! I needed a new pillow, too, and have been wanting to try a memory foam one, so this Bag of Comfort was quite a deal for me.

IMGP2367

The topper is marked as being sized for a long XL twin (standard dorm bed, apparently). I have a full size bed and the topper is plenty big enough for me since I only sleep on one half of the bed anyway (it’s only a few inches narrower than the mattress). I think a couple could fit on it if they really wanted to as it’s a lot wider than I expected.

It was a good drive to go get both the topper and the piece of cable. My “Danger! Danger! Danger!” alert did go off at the U.S. border when they started to ask me questions about Mexico and what I do for a living. The question I have never flat out been asked, but was dreading, came, “Do you work in Mexico?”

I don’t lie at the border and I think people who do are idiots looking for trouble. So I replied in the affirmative. A very, very, very long beat passed and I wondered if they were making notes in my file that would cause me issues next month. Finally, the other officer came back to my window. “Sorry. We’re both confused. Do you work in Spanish or?”

He was curious, not suspicious. Classic U.S. customs scenario for me and I started to relax. “No, no, no. I work for my existing clients from the computer. I don’t have a visa to take a Mexican job.”

“Oh, that makes more sense! Mexico wouldn’t care since you’re not taking one of their jobs and you’re spending money. Good for you! Have a good afternoon in Montana!”

And that was that. American border officials are generally so lovely. It’s almost always, “Welcome to America! We’re glad to have you and your money, but, please, don’t overstay your welcome,” a sharp comparison to consistently being treated like a criminal by my country’s border officials.

I got to Plentywood around 11:30 and immediately went for lunch. Then, I got my packages, which cost me $10 ($5 each). I think the amount would add up really fast if I was frequently having stuff sent to them, but for these occasional situations, it’s a bargain since you get the confirmation that your packages are on site (something I don’t get in Opheim for the same price) and the package room is more secure.

After, I went across the street to a hardware store to get a faceplate for my booster project as well as some copper wire. The gal who served me was really helpful, but the surly man working there was rather unpleasant. Anyway, I got what I needed, so I was happy.

Then, I headed to a museum just east of town that I believed was open at 1:00 p.m. after Labour Day, but it wasn’t. Oh, well. I pointed the truck towards home and found a Dairy Queen tucked away off the main drag, so I popped in for a Blizzard. A ‘mini’ was still way more Blizzard than anyone should eat, but I highly recommend brownie cookie dough. 🙂

The border was quickly upon me after my snack and I sat at the window for what felt like ages but was probably only five minutes until someone acknowledged me. It was a very quick interview: where do I live, how long was I in the States, how much did I have to declare, and did I have any drugs or ATF? And that was it! I didn’t even have to go in to pay my $8.50 or so in taxes and no one emptied my truck (which was absolutely empty except for myself, my purse, and my purchases. This was my first easy crossing back into Canada since crossing at the Sault in 2012. I hate CBSA.

And then, it was just rolling hills and I think maybe passing one car all the way home. This picture didn’t turn out that well (my iPhone camera sucks compared to my Pentax), but I was struck by the golden trees contrasting with the olive hills. Fall is here!

IMG_0692

When I got home, I spent about three hours finishing up my booster installation. I can’t believe it was that long, but time flew by since everything was coming together fairly easily and, so, I was having fun! That post will be next!

A Workshop and Gardening Shed

I made a classic decluttering/organizing mistake as I started to work on my shed: shopping for organizational products before actually knowing what I needed. I know better than that! Thankfully, I didn’t actually buy anything beyond the workbench materials, which I did need.

This morning’s project was to make sense of the gardening/yard side of the shed, empty out the RV basement compartment full of ‘stuff’ that could be stored in the shed, and continue to organize the workshop side. Now that I had a large stable worktop, I could start arranging things by categories and figure out how best to containerize or otherwise make them accessible.

So here was the gardening/yard side when I started this morning, a jumble of tools and materials. Things that I need to be able to take out easily, like the mower, ladder, and wheelbarrow were stored at the back.

IMGP2351

It didn’t make long to build a simple support for my gardening implements at the back of the shed and then move the ladder, wheelbarrow, and mower to the front.

IMGP2356

IMGP2359

Then, using what I had for containers, I sorted through my things and arranged them neatly either on the workbench or under it. I put my wrenches and pliers into old coffee canisters I’d saved and added screws to hold things like a hand broom, bag of tie wraps, levels, and squares. I hung my hammers from the same backer board as my screw drivers and clamps (and boy do I have a lot of clamps!). Does it look as pretty as a pegboard on Pinterest? No. But it’s just as practical and, best of all, it didn’t cost me anything. One my favourite bits is that I hung my tool belt from a hook and then clipped my tape measure to it because I’m always looking for it!

I macro organized hardware, with one tub for miscellaneous screws and another for everything from washers to eye hooks. At some point, I’ll find cubbies or some other organizational product that will let me sort these bits at the micro level. One thing I don’t have that surprised me were any nails! It would have been nice to have some big nails to use as hooks, but I have so many deck screws that it didn’t hurt to use a few of those instead.

IMGP2357

Now, check out the other corner!

IMGP2358

Wow, I didn’t expect to be left with so much room! I’d rather not fill it up since it gives me room to really spread out a project and to use my table saw. One of my next projects will be to come up with a platform on casters so I can roll it around. I also want to build a ramp to more easily take heavy wheeled things outside.

Well, I had a productive long weekend and managed to get away from my computer. Back to work tomorrow! And I may be off to Montana again on Wednesday afternoon, which would be a fun way to break up the week. That will allow me to finish up the booster project so I can post about it! The post is written, but needs some final photographs.

I’m not quite sure what I’m going to do next with myself. Work on my Mexico packing list, I guess! 😀

Building a Workbench

Since expanding my home outside of the RV, I’ve been a bit scattered as far as tools and other renovations bits and bobs go. I’ve had my shed ‘done’ for months now, but just haven’t been able to prioritize the tool organization project. I have kept it in mind, looking for storage solutions, like a tool chest or even a dresser, but haven’t found anything.

One of the things I did decide on very early in my thought process was to build a workbench. I found a plan for a workbench that looked very easy to make and which would afford me not just a work surface, but also some storage. After I bought my table and circular saws, I just needed a nice free day to do the project. Well, it took almost two months, but today was the day!

I bought my materials in town on Friday. The workbench plans claim that it can be built for 50USD, but this being Canada, the project cost me 101CAD all in, including two carpenter pencils and some wood glue. I didn’t have to buy any screws, so that saved me some money. Lumber was 15 2x4s and one sheet of plywood. The workbench plan is really clever as it uses almost the entire materials and has very little waste.

Buying the lumber was very disheartening since it was all crap. Even the ‘best’ 2x4s were warped and chipped and the edges of the plywood were delaminated. I understand now why Charles gets all his lumber in Glasgow, MT. He says it’s not just in Assiniboia at the different home stores that he sees bad lumber, but that he had the same problem in Manitoba. Just another case of Canadians getting shafted, with our good lumber going to the States, we having to pay a premium on the garbage the Americans won’t take, and then having to pay taxes and duty to reimport our own wood.

I had the lumber yard do all but one of the cuts on my plywood so that it would be easier to bring home and so I wouldn’t have to wrangle a huge sheet on my own and try to make straight cuts. They weren’t too keen on doing that for me, even at $2 a cut ($4 total since the first cut was free), but they eventually agreed to.

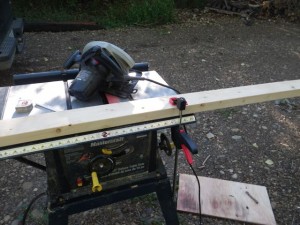
Saturday was way too damp and drizzly to work on this project, but it was bright and sunny, albeit cold (8C/46F) at 8:00 this morning. The forecast called for the day to get increasingly cold, overcast, and windy, so I headed right out to cut all my lumber… and make some space in the workshop. This is what I was starting with:

IMGP2330

IMGP2331

I used both my circular and table saw, depending on the length of the piece I was cutting, and found the process much more laborious than I would have with a miter saw. I’ll definitely get one again once I start building in earnest. Both my table saw and circular saw worked great and I felt safe using them.

IMGP2333

Now, here are some examples of the crap I had to buy.

I only agreed to buy this sheet of plywood knowing that I could plan the cuts for the worst of that water damage to be the waste bit.

IMGP2332

This 2×4 was one of the best they had:

IMGP2335

I labeled all my pieces as I cut them. It was rather like DIY IKEA!

IMGP2334

I stacked all my pieces neatly so that I could find them all:

IMGP2338

I later discovered that I had an F too many and was short a G because I forget to double check my cut sheet. I could have turn an F into a G, but it wasn’t worth pulling out the saws again and I just used an extra F and did without a G since they were supports and there were plenty of those to start with.

Then, it was time to start assembling! This is the frame for the worktop:

IMGP2339

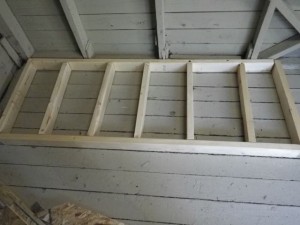
And here is the bottom shelf:

IMGP2341

Notice that it is recessed so that you can sit at the workbench and have room for your legs. For such a simple design that makes such efficient use of materials, this workbench is really well thought out!

Legs on, height is perfect!

IMGP2342

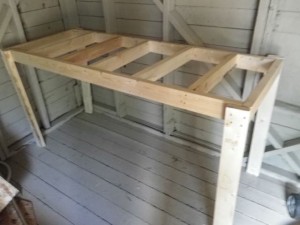
At this point, it was frighteningly wobbly, but the reinforcement was about the begin.

As suggested in the instructions, I used paint cans to hold the bottom shelf in place so I could screw it to the worktop. But I decided to screw the plywood to the bottom shelf before installing it, rather than after. Not sure why the instructions say to do it after as it was much easier to do it before.

I then built the frame for the top shelf and added the plywood to it. The easy bit was done and my project was starting to look like a workbench:

IMGP2343

The next bit was tricky and where I ended up breaking for lunch near 1:00 p.m. I had to screw the top support legs and then get the thing up in the air and screwed to the workbench. I had to rearrange more stuff in the shed to get me room to manoeuver and the whole thing was very heavy, awkward, and fragile, but I got it done.

If you look at the plan, the legs for the top shelf don’t touch the floor, but mine do. The reason was going to be that I was working alone and didn’t have anyone to help me hold it up, but then I realised that the slope of the roof meant that this was as far up as I should be putting the shelf anyway.

Once the top shelf was secure, I added the backer boards. They are for added support, but also to keep things from falling off the back of the workbench and bottom shelf.

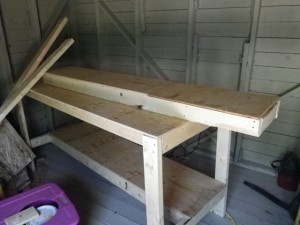
So here it is, and moved into its final position!

IMGP2344

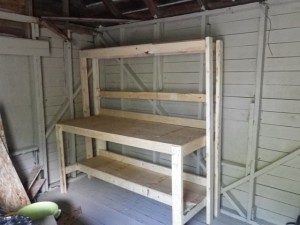
I didn’t hesitate to start using it for storage!

IMGP2345

I was going to get pegboard, but I don’t think I need any. I’ll figure out an alternative way to store the tools that I have left to deal with (wrenches, pliers, hammers, and a few other odds and ends).

My favourite bit is my tape holder. I thought, “Hmm, a dowel would be useful for this and, oh, look, I have one handy. What are the odds?!” I just drilled a hole into the worktop and fit the dowel in it. It could also be a paper towel holder. Time will tell… 🙂

IMGP2347

I was done for the day, but not done by far. Here’s what my makeshift table (plywood on sawhorses) still looks like. 🙂

IMGP2348

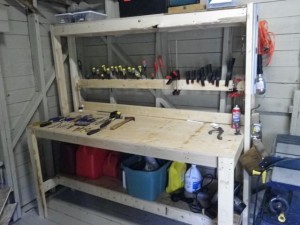
And here’s a view of the whole workbench from the door:

IMGP2349

The top shelf so far has my ‘sharp implements’ and ‘drilling’ containers I’ve had for years in office overhead cabinets, then my (empty) tool box that I’ll be able to fill and take to Mexico this winter, then my dad’s chisels with my socket wrench set over top, then my giant bucket of screws. Underneath, you can see my gas cans, tub of painting/drywall implements, oil for the truck, and then you’ll have to trust me that in the corner are my two drills and my circular saw.

So now the workbench part of the shed is done to a point. I still have to organize more containers for screws, nails, and odd bits, as well as sort out the last of the tools, but it’s a very good start.

If the weather is still good tomorrow, I will sort out the yard/garden corner of the shed to make it easy to take out my wheelbarrow, lawnmower, and ladder.

If you want to take on a project like this, check out Zac’s considerations for building a work bench.

I’m beat and wish I could get pizza or Chinese delivered! But since I can’t, I’m off to scrounge something yummy for dinner!

Propane Sticker Shock

I went to town today since I was out of propane and drinking water. My first stop was the Co-Op home store to return two of the poles I’d bought for my internet setup since I didn’t need them. I thought it was going to be a big hassle where I’d have to explain my project and why I didn’t need the poles, etc., but nope. The clerk said a return wouldn’t be a problem and offered to divest me of the poles. I replied I could go put them back while she started on the transaction. When I came back, I just had to sign a return form, run my card through the POS machine, sign the receipt, and done! I’m only using one pole now, but am keeping a second one just in case anything changes and I decide to mount higher up again.

Then, I went for propane. It was just under $40 to fill my 30lber! I remember days when it was $20 to $25 to fill it! Wow! Even on my current income level, wintering here would be a hardship at those prices for propane, plus electricity has also gone up. Gas, though, has gone back down to an almost reasonable $1.10 a litre.

I grabbed a quick lunch with too much coffee (if such a thing is possible), then decided to check out the Salvation Army. They’ve moved to a smaller location while the store is being renovated and so they don’t have as much stock. Well, I struck gold again in the form of a dark purple scarf, one of the colours I was missing for my collection (just need dark green and a royal blue ones after finding a dark teal recently!) as well as a brand new Jessica brand tee-shirt in my size (also dark purple, coincidentally enough). I was even lucky enough to get the cashier who knows about my scarf collection. She gave me a deep discount on my purchase!

And then, I got water and a very small amount of groceries. I’m already at the “I really need to start bringing down my stores!” part of the summer, so I’m not buying much. I’d like to get the big freezer emptied within two weeks. I have a lot of dried goods that I can bring to Mexico with me if I don’t finish them up, but I really need to get through all the meat and shrimp soon. The Patak’s sauces I discovered recently have been on sale for two weeks straight now ($2 off a jar), so it’s been a good time to try different ones. So far, I love their tikka masala and mango chicken sauces, but dislike their bland pineapple sauce. This week, I got butter chicken. My tastebuds are very happy with these new flavours!

I’d run into about five of my neighbours while out in town today and I ran into another one at the store. We should have all carpooled!

Speaking of carpooling, my truck is making a ‘that doesn’t sound good’ noise. I’m going to take it in for a full checkup in the next couple of weeks to see if it just needs a bit of lubrication or if there is something bad going on. C&C told me which shop to go to, so I’ll call them up next week to see if they can fit me in. I may end up having to go to Mexico in a ‘new’ vehicle, but it definitely won’t be my Transit Connect as I wouldn’t feel comfortable plunking down that kind of money right now. There’s a good used car lot in town where I know I could get something decent for under $3,000 just to get me through the winter. Anyway, I might be worried about nothing since the noise just started after I did all that gravel road driving last week and might just need a good cleaning. We’ll se what the shop says. A checkup won’t hurt!

Back to typing I go. I have lots of transcription to do this weekend!