I woke up to quite a lot of water in the bucket below my bypass valve, so the tape really didn’t work (I knew it was a very long shot!). There is literally no water pressure if I hook up to city water, so I’m always living off the holding tank, which I turn off at night. So the valve leaking this badly with the system not being pressurized really lit a fire under my butt to get this fixed somehow, even if it wasn’t going to be elegant, because obviously the leak was getting worse.
Way back yonder, I used to own a very old mobile house. It was so old that none of its plumbing parts fit existing parts. Minor fixes would involve tearing out large sections and starting from scratch. It was really good plumbing education and I learned a lot about various fixes, some not so orthodox, and what can hold out over time. I got a lot of experience soldering copper pipes, too, and am very good at it! The mobile home park owner would often have me do repair jobs for it and deduct the time I spent from my monthly pad rent!
Miranda’s plumbing is in some respects much easier to deal with. She is plumbed with entirely household materials, not RV-specific parts. But all of her plumbing is squeezed into tight spots and obviously not intended for repair. Because the valve was installed backwards, there was no way it could be fixed. So it had to come out.
I have a little copper pipe cutter, but there was no room for it to swing the full 360 degrees it needs to. It was tricky cut because the whole area was put together so tightly. There was a brass connector on both sides of the valve that I needed to avoid, the copper pipe was covered with a soft grey plastic conduit, over that was a welded steel clamp, and I had to leave myself something with which to join my replacement material.
I estimated where the brass connectors ended and used a steak knife to cut through the soft grey conduit. Thankfully, there was no copper on the side of the valve closest to the wall and the knife sliced through the conduit like it was butter! Even though the water system wasn’t pressurized and I’d bled the line, I still got sprayed. What a mess!
The other side was trickier because there was copper under the plastic conduit. I painstakingly sawed at it with a for-metal jigsaw blade held with pliers, which took me almost an hour with only a short break. Thankfully, it was very small diameter pipe and I didn’t have much to get through!
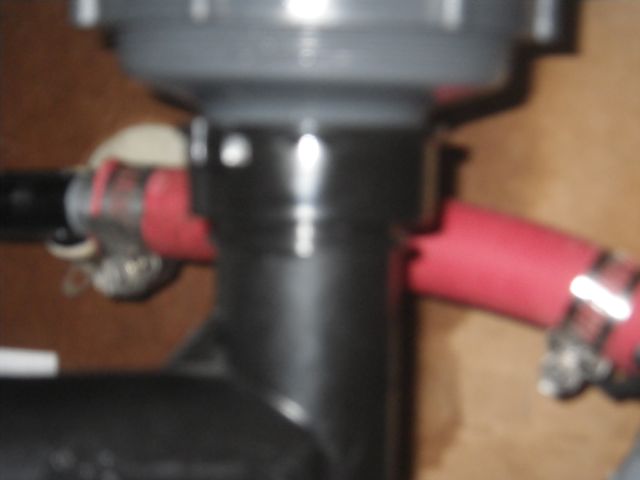
So now, the valve was out, but I needed to close out my system or be without water. I had decided before bringing myself to the point of no return to use a piece of hose with a couple of clamps. I needed a hose with a diameter big enough to fit over piece of garden hose. I went out to my MacGyver pile, rummaged around, and found a length of hose that looked perfect — rubber, thick, reasonably flexible, and with the right diameter. I found clamps in my plumbing parts bin. Unfortunately, there wasn’t enough pipe onto which I could fit the hose to double clamp.
It took a bit of effort and bleeding (but no swearing, surprisingly enough) to get the hose positioned in such a way that the clamps could form the necessary seal. I turned the pump on about four times and got sprayed as many times before the leaks stopped.

Cautiously optimistic, I left the pump on and dragged out the dehumidfier.
It’s been eight hours and the repair has held. Will it keep doing so? Only time will tell. I do know that I’ll need to tighten my clamps every so often and that the system not being constantly under pressure will work in my favour.